

How To Install Opencv On Raspberry Pi
Solarian Developer
My programming ramblings
Install OpenCV 4 on Raspberry Pi for C++ and Python development
Posted on September 17, 2022 by Paul
In this article, I will show you lot how to install OpenCV 4 with Python and C++ support on Raspberry Pi. I assume that you have the latest Raspbian installed on your Raspberry Pi, which at the fourth dimension of this writing is based on Debian 10 Buster.
Unfortunately, there is no official binary of OpenCV 4 for Raspberry Pi, so I had to built OpenCV with Python 2 and three support for Raspberry Pi Zero and upwardly from sources. If you want to do the build yourself bank check my previous articles:
-
Cross compiling OpenCV 4 for Raspberry Pi and BeagleBone Black.
-
Cross compiling OpenCV four for Raspberry Pi Cipher.
In this article I'll will bear witness you how to install the already built binaries.
In that location is also a video version of this tutorial:
Allow's offset by downloading the already built OpenCV 4 from https://github.com/sol-prog/raspberry-pi-opencv/releases/. As y'all can come across, there are iv binaries: two for RPi Zero with and without GUI support and two for RPi ii and up with and without GUI support. Pick the proper version for your RPi.
In the remaining of this article, I volition presume that you want to install the full GUI version on a RPi two and upwards. If you are using RPi Nothing just change the proper noun of the files appropriately.
Open up a Concluding and download the desired version of OpenCV:
1 wget https://github.com/sol-prog/raspberry-pi-opencv/releases/download/opencv4rpi2.ane/opencv-4.1.0-armhf.tar.bz2 Next, extract the archive:
1 tar xvf opencv-4.one.0-armhf.tar.bz2 Once the archive was extracted, move the resulting opencv-4.1.0 folder to /opt:
1 sudo mv opencv-four.1.0 /opt Optionally, you can remove the annal:
1 rm opencv-4.ane.0-armhf.tar.bz2 Next, we are going to install a couple of libraries required past OpenCV:
one sudo apt install libtiff-dev zlib1g-dev 2 sudo apt install libjpeg-dev libpng-dev 3 sudo apt install libavcodec-dev libavformat-dev libswscale-dev libv4l-dev four sudo apt-get install libxvidcore-dev libx264-dev five sudo apt install python-numpy python3-numpy The side by side two libraries are just required if you are using the GUI version of OpenCV, y'all tin safely ignore these if you are using the headless version:
1 sudo apt install libgtk-iii-dev libcanberra-gtk3-dev Next, we'll add OpenCV to the system library path, you lot'll demand to run these commands from your domicile folder:
i cd ~ 2 echo 'export LD_LIBRARY_PATH=/opt/opencv-4.one.0/lib:$LD_LIBRARY_PATH' >> .bashrc three . .bashrc Restart your Terminal or log in and log out if yous are connected to your RPi through SSH.
Next, permit's create some symbolic links that will allow Python to load the newly created libraries:
one sudo ln -s /opt/opencv-4.i.0/lib/python2.7/dist-packages/cv2 /usr/lib/python2.7/dist-packages/cv2 2 sudo ln -s /opt/opencv-4.1.0/lib/python3.7/dist-packages/cv2 /usr/lib/python3/dist-packages/cv2 Install git if necessary:
i sudo apt install git Nosotros'll clone a simple config file useful if yous want to be able to utilize OpenCV from C++:
1 git clone https://gist.github.com/sol-prog/ed383474872958081985de733eaf352d opencv_cpp_compile_settings 2 cd opencv_cpp_compile_settings/ 3 sudo cp opencv.pc /usr/lib/arm-linux-gnueabihf/pkgconfig four cd ~ five rm -rf opencv_cpp_compile_settings/ At this point, you should be able to use the OpenCV library from C++ or Python.
On the repository for this commodity you can discover a few C++ and Python test programs. Y'all can download the lawmaking on your Pi with:
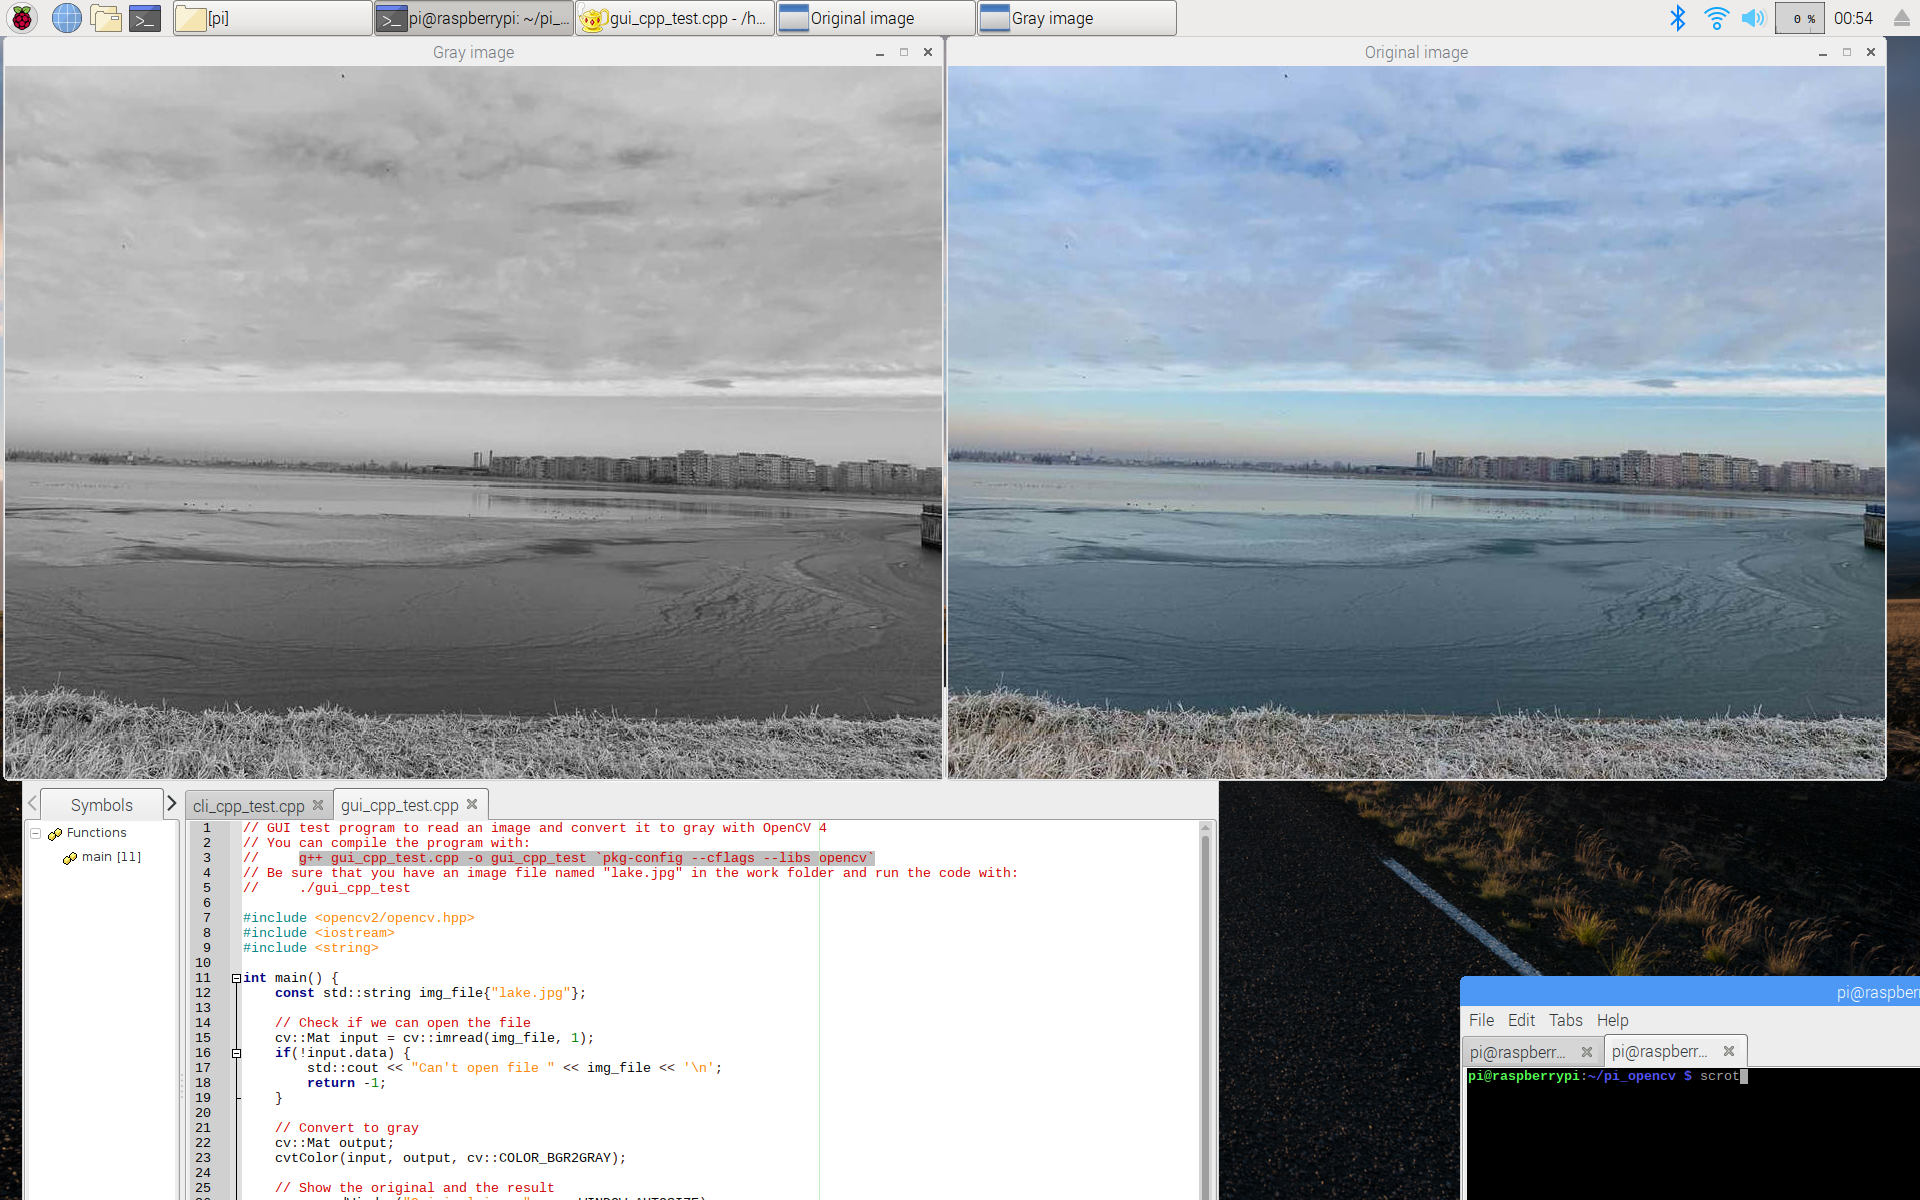
1 git clone https://github.com/sol-prog/raspberry-pi-opencv.git 2 cd raspberry-pi-opencv/tests In that location are two headless tests that y'all tin use even if you don't accept a display connected to your RPi: cli_cpp_test.cpp and cli_python_test.py. I've likewise included two graphical tests that crave a display: gui_cpp_test.cpp and gui_python_test.py.
You tin can build and run the C++ tests like this:
one chiliad++ cli_cpp_test.cpp -o cli_cpp_test `pkg-config --cflags --libs opencv` 2 ./cli_cpp_test or, if you have a brandish continued to your RPi:
1 g++ gui_cpp_test.cpp -o gui_cpp_test `pkg-config --cflags --libs opencv` 2 ./gui_cpp_test Hither is a screenshoot of the C++ GUI test running on my Pi:
For the Python tests, utilise:
ane python3 cli_python_test.py or
ane python3 gui_python_test.py If y'all desire to learn more nearly programming on the Raspberry Pi, a very practiced book is Exploring Raspberry Pi by Derek Molloy:

Source: https://solarianprogrammer.com/2019/09/17/install-opencv-raspberry-pi-raspbian-cpp-python-development/
Posted by: adamstright.blogspot.com
0 Response to "How To Install Opencv On Raspberry Pi"
Post a Comment